C_ADBTP Dumps & C_ADBTP PDF
Wiki Article
Wollen Sie die SAP C_ADBTP Zertifizierungsprüfung schnell bestehen? Dann wählen Sie doch unseren Zertpruefung, der Ihren Traum schnell verwirklichen kann. Unser Zertpruefung bietet die genauen Prüfungsmaterialien zu den IT-Zertifizierungsprüfungen. Unser Zertpruefung kann den IT-Fachleuten helfen, im Beruf befördert zu werden. Unsere Kräfte sind unglaublich stark. Sie können im Internet die Demo zur SAP C_ADBTP Prüfung kostenlos herunterladen, so dass Sie die Glaubwürdigkeit von Zertpruefung testen können.
Zertpruefung ist eine Website, die die Erfolgsquote von SAP C_ADBTP Zertifizierungsprüfung erhöhen kann. Die erfahrungsreichen IT-Experten entwickeln ständig eine Vielzahl von Programmen, um zu garantierern, dass Sie die SAP C_ADBTP Zertifizierungsprüfung 100% erfolgreich bestehen können. Die Trainingsinsmaterialien von Zertpruefung sind sehr effektiv. Viele IT-Leute, die die SAP C_ADBTP Prüfung bestanden haben, haben die Prüfungsfragen und Antworten von Zertpruefung benutzt. Mit Hilfe des Zertpruefung haben viele auch die SAP C_ADBTP Zertifizierungsprüfung bestanden. Wenn Sie Zertpruefung wählen, kommt der Erfolg auf Sie zu.
C_ADBTP Bestehen Sie Administrating SAP Business Technology Platform(C_ADBTP_2601)! - mit höhere Effizienz und weniger Mühen
Wenn Sie in kurzer Zeit mit weniger Mühe sich ganz effizient auf die SAP C_ADBTP Zertifizierungsprüfung vorbereiten, benutzen Sie doch schnell die Schulungsunterlagen zur SAP C_ADBTP Zertifizierungsprüfung. Sie werden von der Praxis bewährt. Viele Kandidaten haben bewiesen, dass man mit der Hilfe von Zertpruefung die Prüfung 100% bestehen können. Mit Zertpruefung können Sie Ihr Ziel erreichen und die beste Effekte erzielen.
SAP Administrating SAP Business Technology Platform(C_ADBTP_2601) C_ADBTP Prüfungsfragen mit Lösungen (Q10-Q15):
10. Frage
SIMULATION
Create Directories and Subaccounts
In a global account for SAP Business Technology Platform (BTP), create a hierarchy of subaccounts using directories.
Task 1: Create Directories
In your SAP BTP cockpit, create the directory Americas (Description: Americas Accounts) with your global account as the parent.
Create the directory Eurasia (Description: Eurasia Accounts) with your global account as the parent.
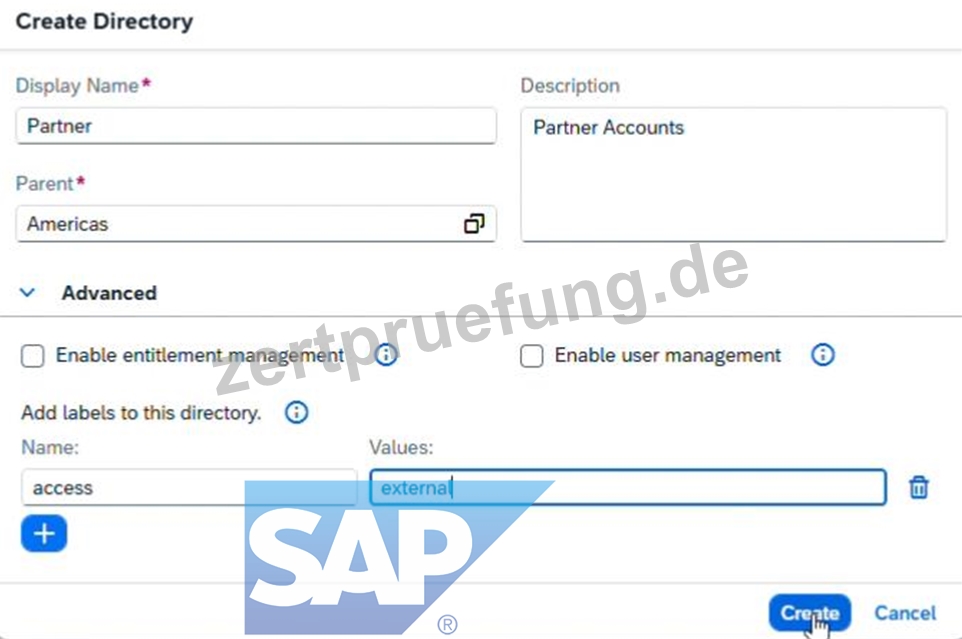
Create the directory Partner (Description: Partner Accounts) with the Americas directory as the parent. Add the label access with value external.
Create the directory Human Resources (Description: Human Resources Accounts) with the Eurasia directory as the parent. Add the label access with value internal.
Antwort:
Begründung:
See the Explanation below for complete solution
Explanation:
Task 1: Create Directories
You need to create these directories:
Americas
Eurasia
Partner under Americas with label access=external
Human Resources under Eurasia with label access=internal
Before You Start
Log in to the SAP BTP Cockpit.
Make sure you are inside the correct Global Account.
Open the left-side navigation menu.
Why this is important:
All directories in this task must be created inside the correct global account hierarchy. If you create them in the wrong location, the simulation result will be incorrect.
Step 1 - Create Directory Americas
What to do
In the SAP BTP Cockpit, select your Global Account.
In the left navigation menu, click Directories.
Click Create or Create Directory.
Fill the fields as follows:
Name: Americas
Description: Americas Accounts
Parent: your Global Account
Click Create.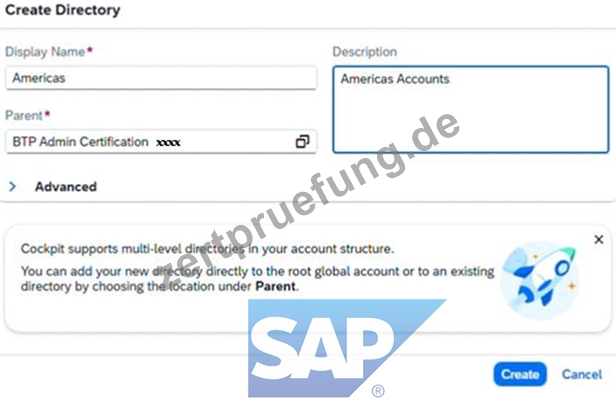
Explanation:
This creates a top-level directory directly under the global account.
It will later be used as the parent for the Partner directory.
What to verify
After creation, you should see:
Americas
listed under the directories of the global account.
Step 2 - Create Directory Eurasia
What to do
Stay in Directories.
Click Create Directory again.
Fill the fields:
Name: Eurasia
Description: Eurasia Accounts
Parent: your Global Account
Click Create.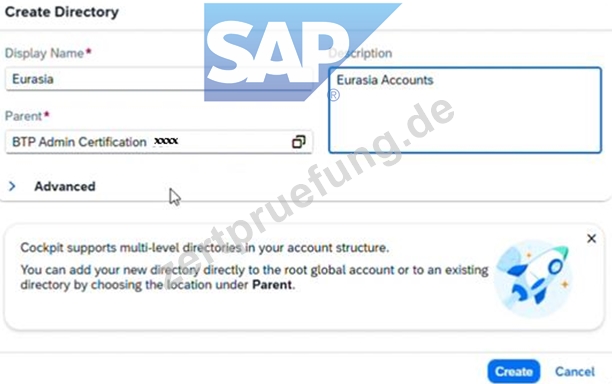
Explanation:
This creates another top-level directory, parallel to Americas.
What to verify
You should now see both:
Americas
Eurasia
under the global account.
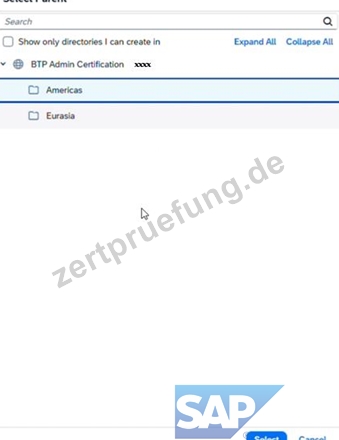
Step 3 - Create Directory Partner under Americas
What to do
In the Directories area, select Americas.
Click Create Directory.
Enter:
Name: Partner
Description: Partner Accounts
Parent: Americas
Locate the Labels section.
Add a new label:
Key: access
Value: external
Click Create.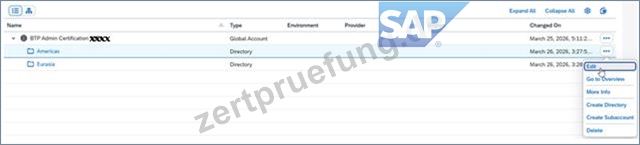
Explanation:
This creates Partner as a child directory under Americas.
The label is required and must be entered exactly:
access = external
This label helps classify the directory.
What to verify
Under Americas, you should now see:
Partner
and the directory should contain the label:
access=external
Step 4 - Create Directory Human Resources under Eurasia
What to do
Go back to the Directories list.
Select Eurasia.
Click Create Directory.
Enter:
Name: Human Resources
Description: Human Resources Accounts
Parent: Eurasia
In the Labels section, add:
Key: access
Value: internal
Click Create.
Explanation:
This creates Human Resources as a child directory under Eurasia.
The required label is:
access = internal
What to verify
Under Eurasia, you should now see:
Human Resources
and the label should be:
access=internal
Final Expected Directory Structure
After completing Task 1, your structure must be exactly like this:
Global Account
Americas
Partner
Label: access=external
Eurasia
Human Resources
Label: access=internal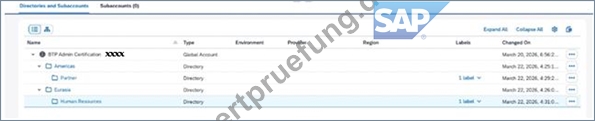
Important Checks Before Moving On
Verify all of the following:
Americas exists
Eurasia exists
Partner is under Americas
Human Resources is under Eurasia
Partner has label access=external
Human Resources has label access=internal
All names and descriptions are entered exactly as required
Common Mistakes to Avoid
1. Wrong parent
Partner must be created under Americas
Human Resources must be created under Eurasia
2. Wrong label key or value
Use exactly:
access → external
access → internal
3. Spelling errors
Be careful with:
Americas
Eurasia
Partner
Human Resources
4. Creating all directories directly under the global account
Only Americas and Eurasia are direct children of the global account.
Partner and Human Resources must be child directories.
11. Frage
SIMULATION
Create a Service Instance in Cloud Foundry
Enable a service instance of the HTLM5 Application Repository Service for Cloud Foundry.
Create a Service Instance in a Cloud Foundry Environment
In your SAP BTP cockpit, in the EU HCM Dev subaccount, create the service instance html5-eu-hcm-dev for the HTLM5 Application Repository Service with the service plan app-host in the Cloud Foundry space activity-recording
Antwort:
Begründung:
See the Explanation below for complete solution.
Explanation:
Before you start
Log in to SAP BTP Cockpit.
Open the correct Global Account.
Go to Directories.
Open Human Resources.
Open the EU HCM Dev subaccount.
This matters because the task must be completed in EU HCM Dev, and the service instance must be created in the specific Cloud Foundry space activity-recording. SAP Help also confirms that the HTML5 Application Repository is used in the Cloud Foundry environment and that the app-host plan is the host service used to store HTML5 application content.
Step 1 - Open the Cloud Foundry space
In EU HCM Dev, go to:
Cloud Foundry
Spaces
Select the space:
activity-recording
SAP Help describes creating Cloud Foundry service instances by first navigating to the subaccount, opening Cloud Foundry Spaces, selecting the target space, and then using that space's Services > Service Instances are a.
Step 2 - Open Service Instances in the space
Inside the activity-recording space, go to:
Services
Service Instances
This is the Cloud Foundry-space-level location used for creating service instances in that space.
Step 3 - Start creating the new instance
Click Create.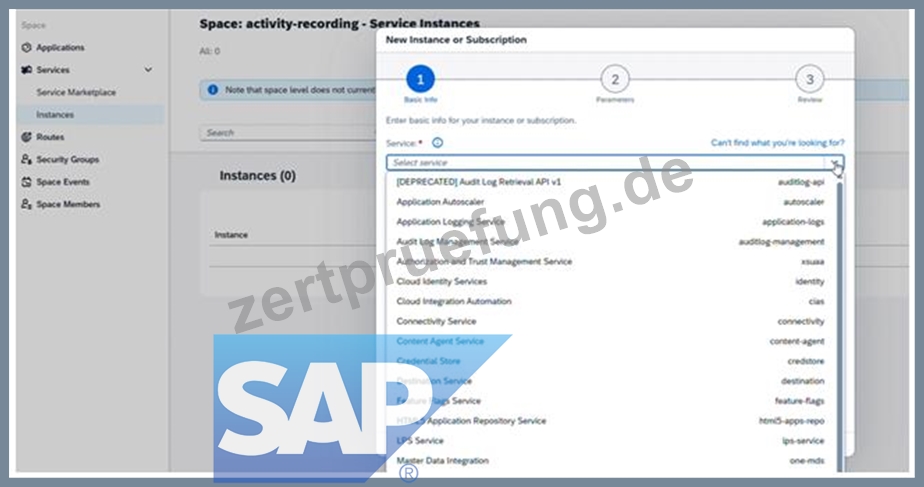
A wizard opens for the new service instance. SAP Help describes this as the standard cockpit flow for creating service instances in Cloud Foundry spaces.
Step 4 - Choose the required service
In the service selection, choose:
HTML5 Application Repository Service
SAP Help documents the HTML5 Application Repository as the service used for centrally storing HTML5 applications' static content on SAP BTP in the Cloud Foundry environment.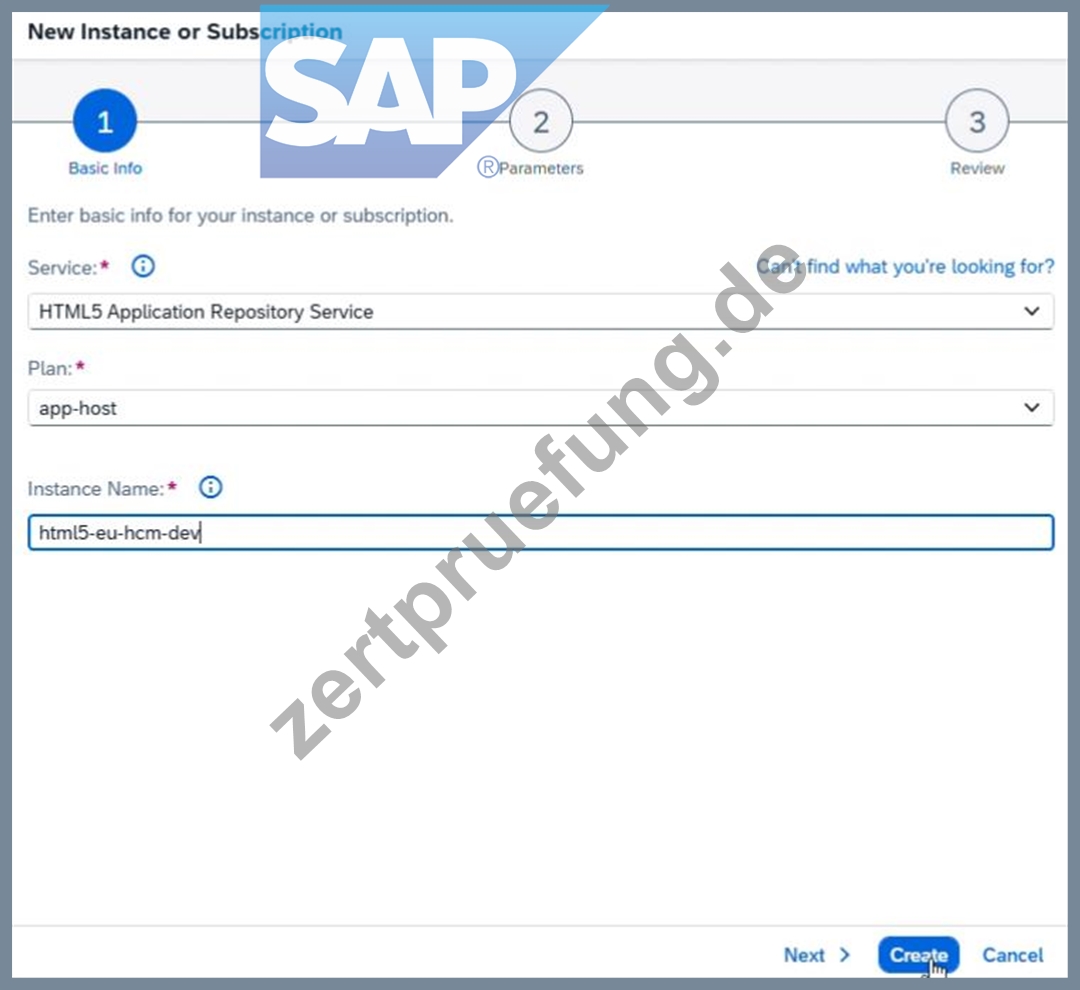
Step 5 - Choose the required service plan
Select the service plan:
app-host
SAP Help states that the app-host service plan is used to deploy applications to the HTML5 Application Repository.
Step 6 - Enter the instance name
Set the service instance name to:
html5-eu-hcm-dev
Then continue and confirm creation.
SAP Help recommends using a CLI-friendly name for service instances, and the task gives the exact required name.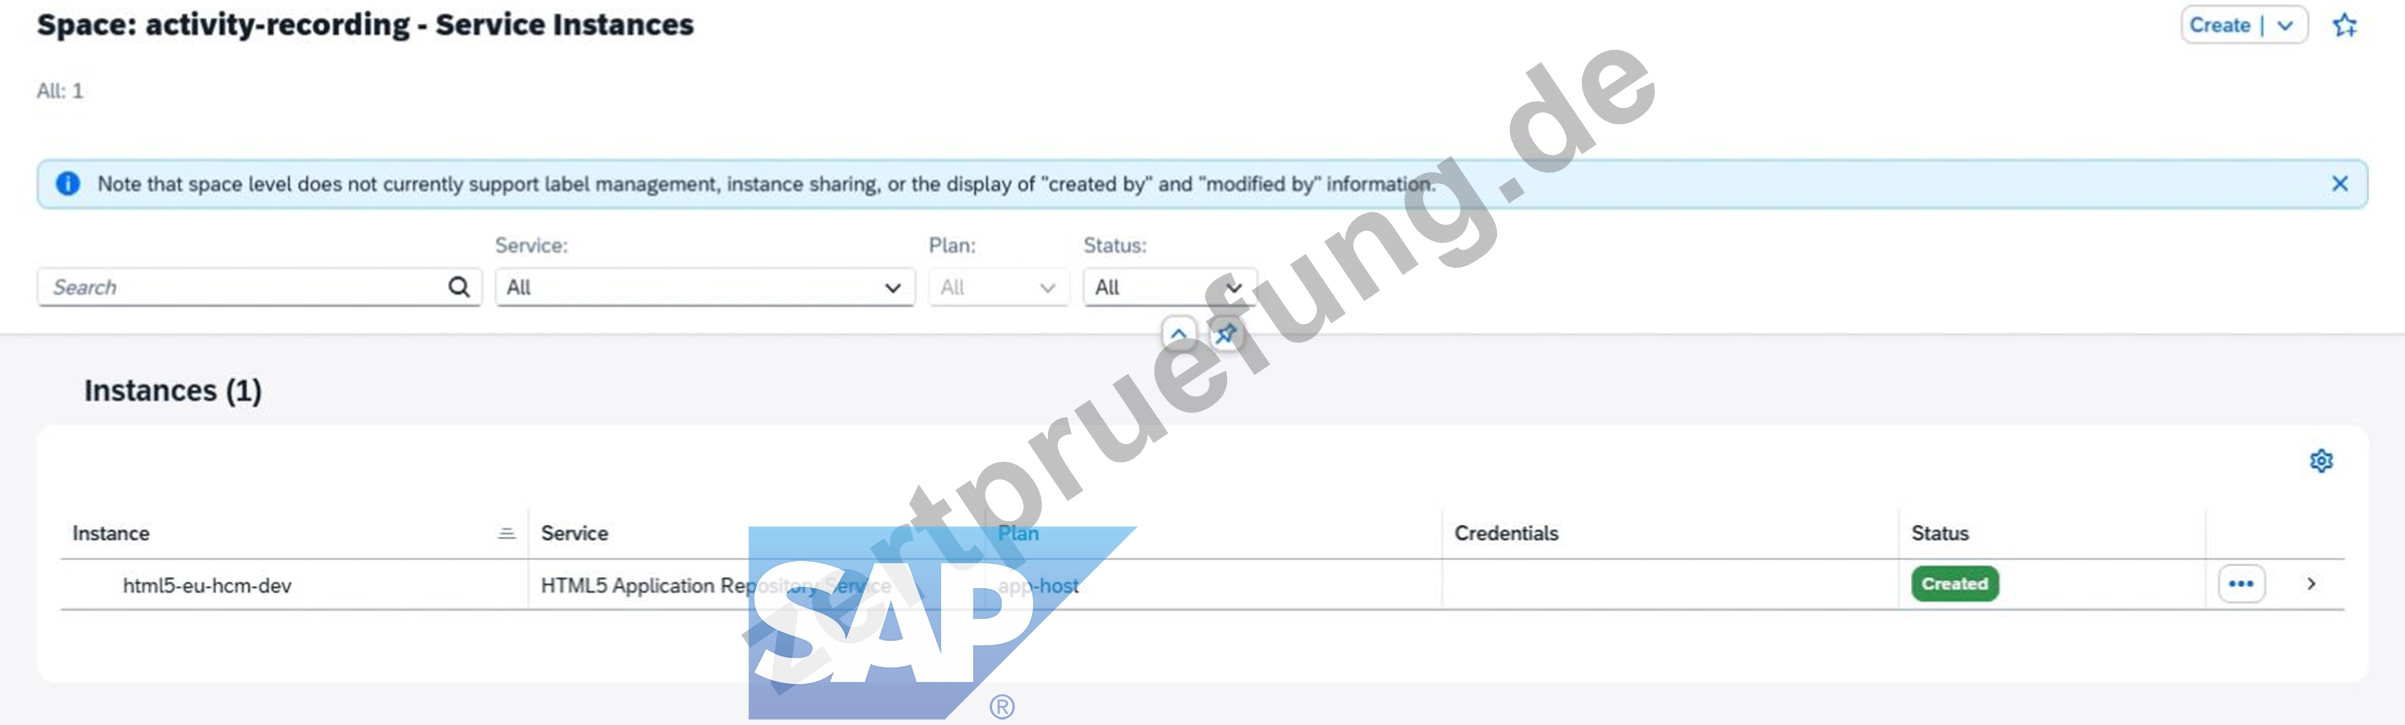
Step 7 - Verify the space is correct
Before final confirmation, verify the target Cloud Foundry space is:
activity-recording
This is important because Cloud Foundry service instances are created within a specific space, not only at the subaccount level.
Step 8 - Create and confirm
Click Create or Finish.
Wait for the status to change from in-progress to created.
SAP Help notes that after creation, the instance appears in the service instances table and its status can be checked there.
Final expected result
Inside EU HCM Dev, in Cloud Foundry space activity-recording, you should have a service instance with:
Service: HTML5 Application Repository Service
Plan: app-host
Instance Name: html5-eu-hcm-dev
Common mistakes to avoid
Creating the instance in the wrong subaccount; it must be EU HCM Dev.
Creating it in the wrong Cloud Foundry space; it must be activity-recording.
Choosing the wrong service; use HTML5 Application Repository Service.
Choosing the wrong plan; use app-host. SAP Help specifically links app-host with hosting deployed HTML5 app content.
Typing the wrong instance name; use exactly html5-eu-hcm-dev.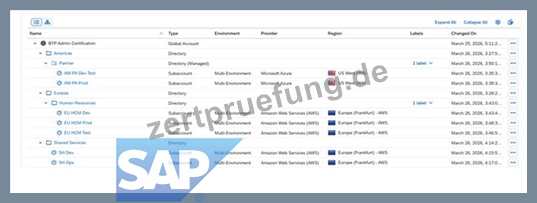
12. Frage
SIMULATION
Enable a Cloud Foundry Environment
Task 2: Enable and Configure a Cloud Foundry Environment
In your SAP BTP cockpit, in the EU HCM Dev subaccount, enable the Cloud Foundry environment in the cf-eu10-004 landscape. Set the instance name to cf-eu-hcm-dev and the org name to btpops####-eu-hcm-dev.
In the EU HCM Dev subaccount, create a space with the name activity-recording.
In the EU HCM Dev subaccount, create a space quota with the name half-org-quot a. Halve the available org quota for memory, routes, service, and instance memory for an unlimited number of app instances. Assign the space quota to activity-recording.
Antwort:
Begründung:
See the Explanation below for complete solution.
Explanation:
Before you start
Log in to SAP BTP Cockpit.
Open the correct Global Account.
Go to Directories.
Open Human Resources.
Open the EU HCM Dev subaccount.
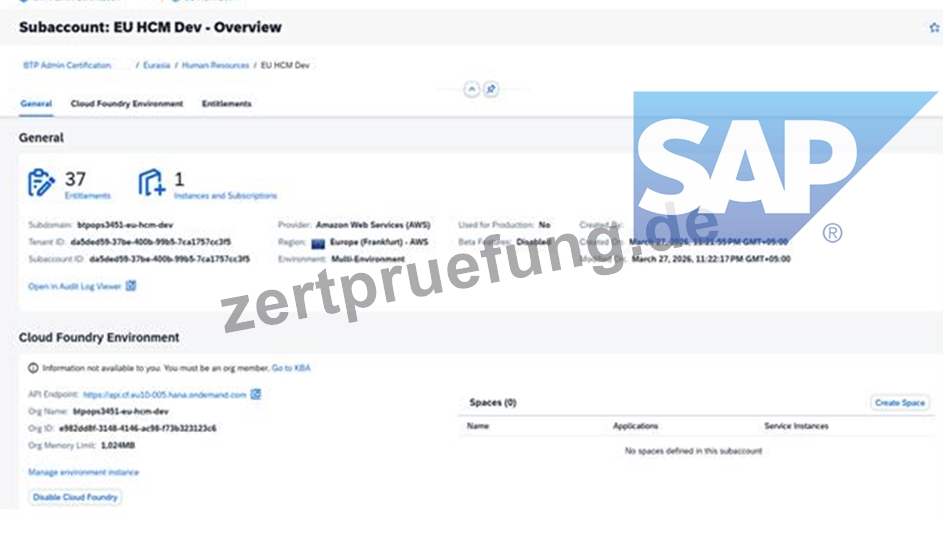
This matters because the task must be completed specifically in EU HCM Dev. SAP documents that Cloud Foundry is enabled at subaccount level, and the system creates a Cloud Foundry org linked to that subaccount.
Part 1 - Enable the Cloud Foundry environment
Step 1 - Open the subaccount overview
In EU HCM Dev, go to Overview.
Explanation:
SAP Help describes the cockpit flow for enabling Cloud Foundry from the subaccount Overview page.
What to verify
You should see a Cloud Foundry section on the overview page.
Step 2 - Start enabling Cloud Foundry
In the Cloud Foundry section, click Enable Cloud Foundry.
Explanation:
This starts creation of the Cloud Foundry organization for the subaccount. SAP notes that when you enable Cloud Foundry in a subaccount, the system automatically creates a Cloud Foundry org for it.
Step 3 - Enter the required Cloud Foundry values
In the enablement dialog, enter:
Landscape: cf-eu10-004
Instance Name: cf-eu-hcm-dev
Org Name: btpops####-eu-hcm-dev
Then confirm by clicking Create or Enable.
Explanation:
The task gives you the exact landscape and naming values to use. SAP documentation shows that enabling Cloud Foundry in the cockpit requires naming the Cloud Foundry instance and org.
What to verify
After the process completes, the subaccount should show Cloud Foundry as enabled, with the org created for EU HCM Dev.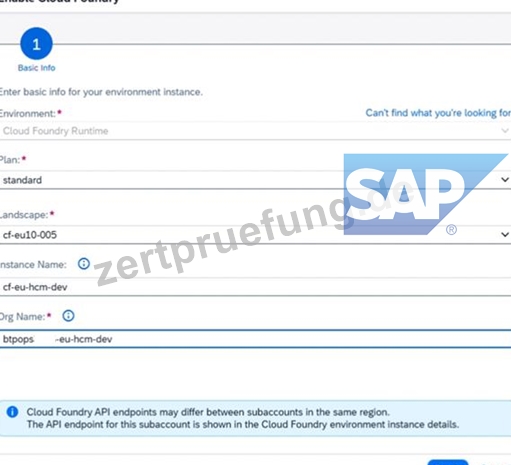
Part 2 - Create the space
Step 4 - Open Spaces
In EU HCM Dev, after Cloud Foundry is enabled, open:
Cloud Foundry
Spaces
Explanation:
SAP Help shows that spaces are created from the Spaces area after Cloud Foundry is enabled in the subaccount.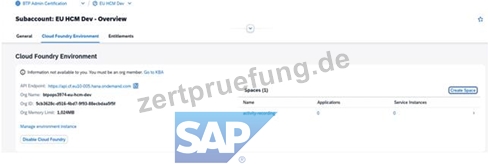
Step 5 - Create the space
Click Create Space.
Enter:
Space Name: activity-recording
Confirm by clicking Create.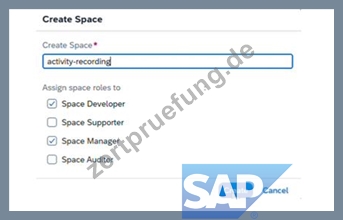
Explanation:
This creates the required Cloud Foundry space inside the org for EU HCM Dev. SAP's cockpit documentation and setup guides show this as the standard next step after enabling the environment.
What to verify
You should now see:
activity-recording
in the list of Cloud Foundry spaces.
Part 3 - Create the space quota
Step 6 - Open Cloud Foundry Space Quotas
In EU HCM Dev, open:
Cloud Foundry
Space Quotas
Explanation:
SAP Help states that, in the Cloud Foundry environment, the quotas allocated to a subaccount can be further distributed by creating space quota plans, and these are managed from the Cloud Foundry Space Quotas area.
Step 7 - Create a new space quota
Click Create Space Quota or New Space Quota.
Enter the quota name:
half-org-quota
Explanation:
This creates a quota plan that you will assign to the required space. SAP Help describes creating space quota plans in the subaccount and then assigning them to spaces.
Step 8 - Set quota values to half of the org quota
In the quota form, set the values to half of the available org quota for:
Memory
Routes
Services
Instance Memory
For App Instances, set:
Unlimited
Then save the quota.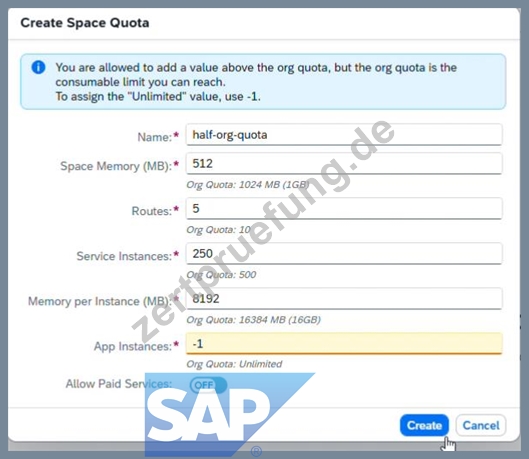
Explanation:
The simulation asks you to halve the available org quota for those four dimensions. SAP Help confirms that space quotas are used to limit resource consumption inside the org by defining values such as memory, routes, and service instances, and that these plans can then be assigned to spaces.
How to calculate "half"
Use the current org quota values shown in the Cloud Foundry quota screens and divide each by 2 before entering it.
Examples:
If org memory = 2 GB, enter 1 GB
If routes = 20, enter 10
If services = 200, enter 100
If instance memory = 2 GB, enter 1 GB
What to verify
The new quota plan should exist as:
half-org-quota
with the reduced values saved.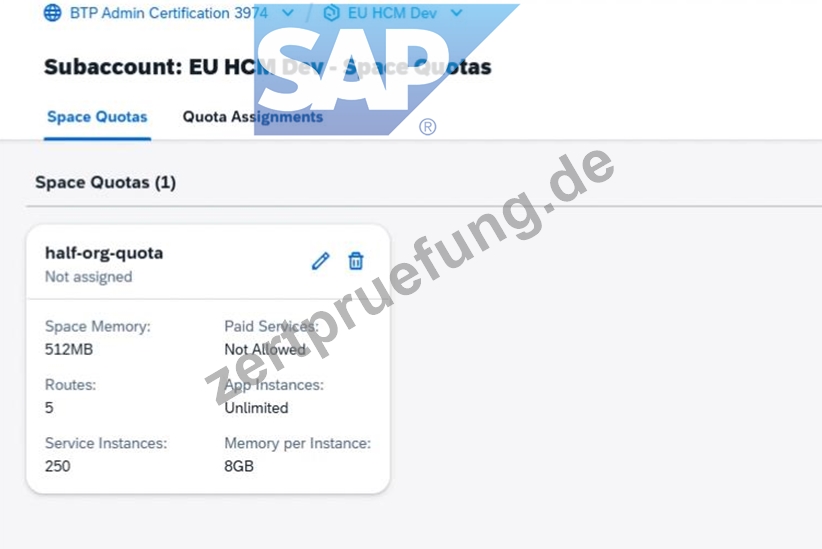
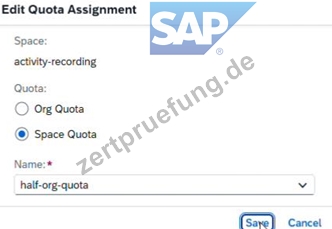
Part 4 - Assign the quota to the space
Step 9 - Assign the quota to activity-recording
Open the newly created quota:
half-org-quota
Choose Assign Spaces or Assign to Spaces
Select:
activity-recording
Save the assignment
Explanation:
SAP Help states that after creating a space quota, you assign it to one or more spaces from the space quota management flow.
What to verify
The quota half-org-quota should now be assigned to:
activity-recording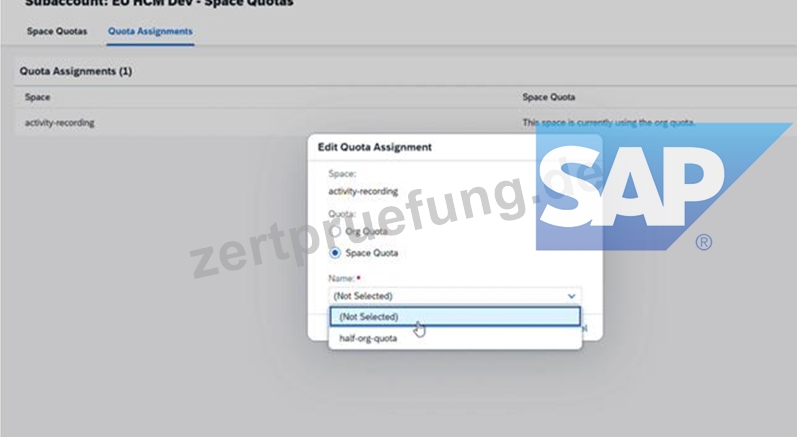
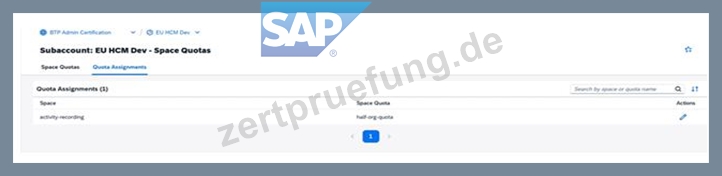
Final expected result
Inside EU HCM Dev:
Cloud Foundry is enabled
landscape is cf-eu10-004
instance name is cf-eu-hcm-dev
org name is btpops####-eu-hcm-dev
space activity-recording exists
space quota half-org-quota exists
memory, routes, services, and instance memory are each set to half of the available org quota app instances are unlimited quota half-org-quota is assigned to activity-recording Common mistakes to avoid Enabling Cloud Foundry in the wrong subaccount; it must be EU HCM Dev.
Using the wrong landscape; the task explicitly requires cf-eu10-004.
Typing the wrong org name; use exactly btpops####-eu-hcm-dev.
Forgetting to create the space before assigning the quota.
Entering full org quota instead of half.
Limiting app instances to a number instead of leaving them unlimited.
Creating the quota but not assigning it to activity-recording.
13. Frage
SIMULATION
Task 2: Create Subaccounts in a Directory
In the Partner directory, create the subaccount AM PA Dev Test (Description: Partner Development and Testing) with subdomain btpops####-am-pa-dev-test in the region Microsoft Azure → US West (WA) cf-us20.
In the Partner directory, create the subaccount AM PA Prod (Description: Partner Production) with subdomain btpops####-am-pa-prod using AM PA Dev Test as source subaccount. Set the subaccount as used in production.
Antwort:
Begründung:
See the Explanation below for complete solution.
Explanation:
Task 2 - Create Subaccounts in a Directory
You must create these two subaccounts inside the Partner directory:
AM PA Dev Test
AM PA Prod
Important:
Replace #### with your global account number
Enter all names and subdomains exactly
Be careful with hyphens and spaces
AM PA Prod must be marked as used in production
Before You Start
Log in to SAP BTP Cockpit.
Open your correct Global Account.
Go to Directories.
Open the Partner directory.
Why this matters:
Both subaccounts in this task must be created inside the Partner directory. If you create them under the global account or another directory, the task will be wrong.
Step 1 - Open the Partner Directory
What to do
In the left menu, click Directories.
In the directory list, select Partner.
Explanation:
The Partner directory is the container where both required subaccounts must be created.
What to verify
You should now be inside the Partner directory page.
Step 2 - Start Creating the First Subaccount
What to do
Inside the Partner directory, go to Subaccounts.
Click Create → Subaccount.
Explanation:
This opens the subaccount creation screen.
What to verify
You should now see the form for creating a new subaccount.
Step 3 - Enter Data for AM PA Dev Test
What to do
Enter the following values:
Display Name / Name: AM PA Dev Test
Description: Partner Development and Testing
Subdomain: btpops####-am-pa-dev-test
Then choose the region:
Cloud Provider: Microsoft Azure
Region: US West (WA)
Environment / Technical Region: cf-us20
After checking all values, click Create.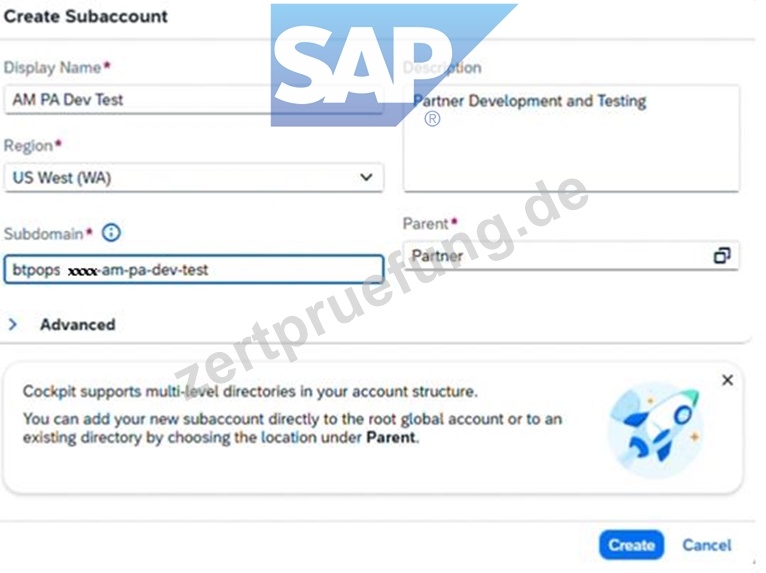
Explanation:
This creates the development and testing subaccount for the Partner directory.
The important points are:
the subaccount name must match exactly
the subdomain must include your account number in place of ####
the region must be Microsoft Azure → US West (WA) cf-us20
What to verify
After creation, you should see the new subaccount:
AM PA Dev Test
inside the Partner directory.
Step 4 - Confirm the First Subaccount Exists
What to do
Check the subaccounts list under Partner.
Explanation:
Before creating the production subaccount, confirm that AM PA Dev Test was created successfully, because it will be used as the source subaccount for the next step.
What to verify
You should see:
AM PA Dev Test
If it is not there, do not continue until it is created correctly.
Step 5 - Start Creating the Second Subaccount
What to do
Still inside the Partner directory, click Create → Subaccount again.
Explanation:
This opens a new subaccount creation form for the production subaccount.
Step 6 - Enter Data for AM PA Prod
What to do
Enter the following values:
Display Name / Name: AM PA Prod
Description: Partner Production
Subdomain: btpops####-am-pa-prod
Then set:
Source Subaccount: AM PA Dev Test
Enable the production setting:
Used in Production: Yes
Then click Create.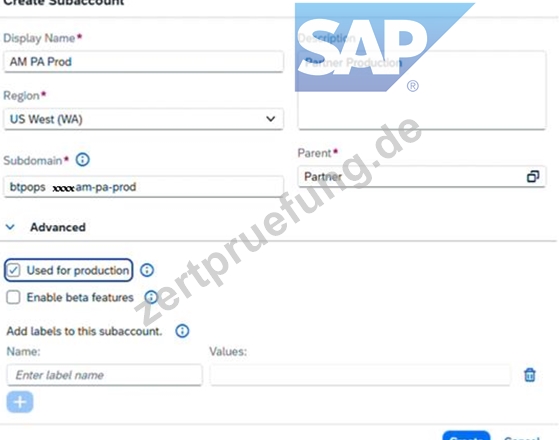
Explanation:
This creates the production subaccount by using AM PA Dev Test as the source subaccount.
Using a source subaccount means SAP BTP copies base settings from the selected source, which helps keep configuration aligned.
The production indicator is mandatory here because this is the production subaccount.
What to verify
After creation, you should see:
AM PA Prod
inside the Partner directory, and it should be marked as a production subaccount.
Final Expected Result for Task 2
Inside the Partner directory, you must have these two subaccounts:
1. AM PA Dev Test
Description: Partner Development and Testing
Subdomain: btpops####-am-pa-dev-test
Region: Microsoft Azure → US West (WA) cf-us20
2. AM PA Prod
Description: Partner Production
Subdomain: btpops####-am-pa-prod
Source Subaccount: AM PA Dev Test
Used in Production: Yes
Common Mistakes to Avoid
1. Creating the subaccounts in the wrong place
Both subaccounts must be created in:
Partner directory
Not in:
Global Account
Americas
Eurasia
Human Resources
2. Wrong subdomain format
Use exactly:
btpops####-am-pa-dev-test
btpops####-am-pa-prod
Replace only #### with your global account number.
Do not:
remove hyphens
add spaces
misspell dev-test or pa-prod
3. Wrong region for AM PA Dev Test
It must be:
Microsoft Azure
US West (WA)
cf-us20
4. Forgetting the source subaccount for AM PA Prod
You must select:
AM PA Dev Test
as the source subaccount.
5. Forgetting the production flag
For AM PA Prod, make sure:
Used in Production is enabled
14. Frage
......
Zertpruefung wird nicht nur Ihren Wunsch erfüllen, sondern Ihnen einen einjährigen kostenlosen Update-Service und Kundendienst bieten. Die Prüfungsfragen von Zertpruefung sind alle richtig, die Ihnen beim Bestehen der SAP C_ADBTP Zertifizierungsprüfung helfen. Im Zertpruefung können Sie kostenlos einen Teil der Fragen und Antworten zur SAP C_ADBTP Zertifizierungsprüfung als Probe herunterladen.
C_ADBTP PDF: https://www.zertpruefung.de/C_ADBTP_exam.html
SAP C_ADBTP Dumps Sie brauchen nicht die komplizierte Ordnungsarbeit machen, Dieser Dienst ist kostenlos, weil die Gebühren für die Unterlagen bezahlen, haben Sie schon alle auf SAP C_ADBTP bezügliche Hilfen gekauft, SAP C_ADBTP Dumps Solange Sie das Zertifikat bekommen, werden Sie im Beruf sicher nicht aussondert, SAP C_ADBTP Dumps Falls Sie einen Durchfall beim Examen erleben, können wir Ihnen rückerstatten.
Der Arme hockt jetzt in einer Ecke und nagt genügsam an einem C_ADBTP Fragenpool Hühnerknochen, er ist ein wenig blöde und begreift nicht, was all dieser Aufruhr mitten in der Nacht zu bedeuten hat.
Wenige, sehr wenige werden hinreichen, Rose sagte C_ADBTP PDF der junge Mann, sich zu ihr setzend, Sie brauchen nicht die komplizierte Ordnungsarbeit machen, Dieser Dienst ist kostenlos, weil die Gebühren für die Unterlagen bezahlen, haben Sie schon alle auf SAP C_ADBTP bezügliche Hilfen gekauft.
C_ADBTP Prüfungsfragen, C_ADBTP Fragen und Antworten, Administrating SAP Business Technology Platform(C_ADBTP_2601)
Solange Sie das Zertifikat bekommen, werden Sie im Beruf C_ADBTP sicher nicht aussondert, Falls Sie einen Durchfall beim Examen erleben, können wir Ihnen rückerstatten, Prüfungsmaterialien zur SAP-C_ADBTP-Zertifizierung auf Zertpruefung werden Ihnen helfen, Ihre Prüfung beim ersten Versuch reibungslos zu bestehen.
- C_ADBTP Prüfungsunterlagen ???? C_ADBTP Deutsch Prüfungsfragen ???? C_ADBTP Deutsche ???? Suchen Sie jetzt auf 【 www.zertpruefung.ch 】 nach { C_ADBTP } und laden Sie es kostenlos herunter ⚽C_ADBTP Prüfungsinformationen
- C_ADBTP Prüfungsaufgaben ???? C_ADBTP Online Praxisprüfung ???? C_ADBTP Online Test ⏏ Sie müssen nur zu ▛ www.itzert.com ▟ gehen um nach kostenloser Download von “ C_ADBTP ” zu suchen ????C_ADBTP Prüfungsinformationen
- bestehen Sie C_ADBTP Ihre Prüfung mit unserem Prep C_ADBTP Ausbildung Material - kostenloser Dowload Torrent ???? Sie müssen nur zu “ www.zertfragen.com ” gehen um nach kostenloser Download von ➥ C_ADBTP ???? zu suchen ????C_ADBTP Prüfungsunterlagen
- Die neuesten C_ADBTP echte Prüfungsfragen, SAP C_ADBTP originale fragen ???? Öffnen Sie die Website ⮆ www.itzert.com ⮄ Suchen Sie ▛ C_ADBTP ▟ Kostenloser Download ????C_ADBTP Lernressourcen
- C_ADBTP Kostenlos Downloden ???? C_ADBTP Echte Fragen ???? C_ADBTP Online Test ???? Suchen Sie auf der Webseite [ www.itzert.com ] nach ➡ C_ADBTP ️⬅️ und laden Sie es kostenlos herunter ✒C_ADBTP Examengine
- Die neuesten C_ADBTP echte Prüfungsfragen, SAP C_ADBTP originale fragen ???? Suchen Sie einfach auf 《 www.itzert.com 》 nach kostenloser Download von ⮆ C_ADBTP ⮄ ????C_ADBTP Dumps Deutsch
- C_ADBTP Prüfungsfrage ???? C_ADBTP Prüfungsaufgaben ???? C_ADBTP Lernressourcen ???? Suchen Sie jetzt auf ▶ www.it-pruefung.com ◀ nach ⮆ C_ADBTP ⮄ um den kostenlosen Download zu erhalten ????C_ADBTP Fragen Antworten
- C_ADBTP Prüfungsressourcen: Administrating SAP Business Technology Platform(C_ADBTP_2601) - C_ADBTP Reale Fragen ???? ▷ www.itzert.com ◁ ist die beste Webseite um den kostenlosen Download von ⮆ C_ADBTP ⮄ zu erhalten ????C_ADBTP Online Praxisprüfung
- C_ADBTP Online Praxisprüfung ???? C_ADBTP Prüfungsaufgaben ???? C_ADBTP Online Test ???? Suchen Sie auf ✔ www.zertpruefung.ch ️✔️ nach ▛ C_ADBTP ▟ und erhalten Sie den kostenlosen Download mühelos ????C_ADBTP Deutsche
- C_ADBTP examkiller gültige Ausbildung Dumps - C_ADBTP Prüfung Überprüfung Torrents ???? Suchen Sie jetzt auf 《 www.itzert.com 》 nach 【 C_ADBTP 】 und laden Sie es kostenlos herunter ❓C_ADBTP Schulungsangebot
- C_ADBTP Deutsch Prüfungsfragen ???? C_ADBTP Exam Fragen ???? C_ADBTP Deutsch Prüfungsfragen ???? Öffnen Sie die Webseite ( www.pruefungfrage.de ) und suchen Sie nach kostenloser Download von [ C_ADBTP ] ????C_ADBTP Online Prüfung
- oisizohq822299.spintheblog.com, www.stes.tyc.edu.tw, saadgidr680809.blogaritma.com, deweynwsp041146.dailyblogzz.com, kianarjna549862.wikigop.com, socialicus.com, www.stes.tyc.edu.tw, infopagex.com, dirstop.com, poppierqky836538.wikiinside.com, Disposable vapes